Metro State 3D Fab

ART 39AS Building 3D Fabricators

Project Leeloo

We can rebuild her. We have the technology. We can make her better than she was. Better…stronger…faster.

Here are some general notes for how we can rebuild our makerbot. I’m calling this Project Leeloo – to rebuild her better than she was. Just a handful of things that Ive been thinking about and for the moment believe would be a good idea to incorporate into our rebuild, making our lives, and our prints, oh so much better.

Mendel inspired XY carriage

Thing 4213 gives us a printable replacement carriage using ball bearings over bushings. Should make things more stable, more efficient, quieter, and cleaner.

Minimal X rod mount

Thing 6884 is one of numerous x rod mounting blocks that secure the x rods to the case. I’m not so sure about the nuts not being fully 100% captive but its worth a shot. There are also x rod mounts in the following.

MiseryBot Z rider
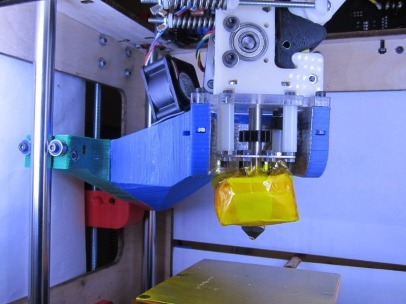
Thing 7954 is an entirely new replacement z axis that will once and for all rid us of the dreaded z wobble. It uses beefy 12mm rods and more ball bearings although Im a little worried about the plastic that close to the heater core.

Yet another extruder

There has to be a solution to our extruder problems: filament drags, the plunger works itself loose, thicker filament is spit back out like green beans, and its hard to clean. Thing 7113 attempts to fix this using ball bearings (see a trend?) and Thing 7564 modifies this for the mk4/5 dc gear motor. Why dc motor? Because while I know the print quality is worlds better until I can get around to redesigning the electrical system Im not so interested in using the gen 4 electronics on the cupcake. Edit: Here are some other files worth a look at: Thing 6402 and 6492.

Arguably that is probably more printing than a new Mendel but we wouldn’t be doing this if it was easy!

Filed under: Build, Mechanical, Things

Wrapping things up

Well folks, we are getting there on the build process and roughly on schedule. It would be super awesome to be calibrating by weeks end, 02.10. A few things to start wrapping it up follows:

Finish heated build platform. It might be a good idea to sand blast the kapton while still in its sticker form and there was something about covering the exposed solder pads on the circuit board, those that might touch the aluminum spreader, so lets double check and get it done to finish wiring.

Wiring and cable management. Double check the graphic above for what connects where, use zip ties on everything to tidy it up, but leave enough room to move at least on those parts that, well, move. The drawing doesn’t show connections to the RELAY BOARD so verify that little mod. Basically, if we hook the heated build platform or mk5 extruder straight to the extruder controller the magic white smoke will escape. To prevent that, we will use a wire from “Extra” on the extruder board and connect that to one input on the relay board. This output will then be connected to the heated build platform. (The wire for the thermistor looks like it connects to “Fan” I assume as an extra input.) Then we use a third wire to connect the “Heater” output on the extruder controller to the second relay and its output is then connected to the heater core on the extruder. (I also noticed this has the wiring for the automatic build platform and ours is not so automatic so the drawing is not entirely useful now is it?)

Mechanical calibration. There looks like some good things to check through on this post including both physical and electrical things to test things out. I think it would be good to do a few steps with the ReplicatorG controlling motors just to make sure the wiring is good. (Remember there are no endstops.)

Test, wire, and test the extruder again. Lets see some melted plastic but before we jump in, lets double check everything 2 or 3 times over. This should probably be done after the extruder and HBP is installed in the bot and all the wiring is complete. Remember relay board. We can continue to work on the mk4 as needed.

Add bling. Use the roll of 12volt led tape, maybe around the inside top of the makerbot? Might be best to hook directly to a spare 12v lead from the power supply.

Update the firmware. This needs to be done on both the extruder board and motherboard to make things work as best as they can.

Hand it over to the software team. Now its tome to see if we can put all of it together to actually print things. Remember here’s some PID settings and a post to calibrate feed rate. Might be useful. Sorry guys, but no one prints at this point until the software team gives us the go ahead.

Filed under: Build

Build team assignments


Here are the tentative build team assignments. Some of this can change as the roster is being finalized… for example, we might need someone from Electronics to jump over to Mechanical but we will sort this out shortly.

Mechanical
Taylor Johnson
Michael Poppitz
Patrick Price
Derek Ralat

Electronics
Michael Moran
Shawn Taylor
Oliver Terry
Patrice Washington
Michael Wheeler

Software
Rachel Hamilton
Kristen Weiss
Angel…a Wolf
Cory Brown

Filed under: Build

More linkage

Software
Generative 3d forms using Processing
Meshlab image processing
Web-based file processing
Evilchicken at Thingiverse

Calibration
Calibration settings discussion
Calibrating Skeinforge pt1
Calibrating Skeinforge pt2
Calibrating Skeinforge pt3
Calibrating Skeinforge pt4
Calculating your feedrate
PID controller tuning

Extruder
Possible extruder modifications
Things I learned assembling my Plastruder MK5
Things I learned cleaning my Plastruder MK5
Things I learned fixing a burned out extruder board

Filed under: Build

ART39AS Building 3D Fabricators

This course introduces DIY digital fabrication through three-dimensional modeling and rapid prototyping technologies for the incorporation into works of art and design. Through the construction of a commercially available open source 3D fabricator, this course addresses issues surrounding open source manufacturing and topics including data acquisition, modeling, visualization, modularity, and material practices.

Calendar

May 2024
M T W T F S S
 12345
6789101112
13141516171819
20212223242526
2728293031  

Categories