Metro State 3D Fab

ART 39AS Building 3D Fabricators

Project Leeloo

We can rebuild her. We have the technology. We can make her better than she was. Better…stronger…faster.

Here are some general notes for how we can rebuild our makerbot. I’m calling this Project Leeloo – to rebuild her better than she was. Just a handful of things that Ive been thinking about and for the moment believe would be a good idea to incorporate into our rebuild, making our lives, and our prints, oh so much better.

Mendel inspired XY carriage

Thing 4213 gives us a printable replacement carriage using ball bearings over bushings. Should make things more stable, more efficient, quieter, and cleaner.

Minimal X rod mount

Thing 6884 is one of numerous x rod mounting blocks that secure the x rods to the case. I’m not so sure about the nuts not being fully 100% captive but its worth a shot. There are also x rod mounts in the following.

MiseryBot Z rider

Thing 7954 is an entirely new replacement z axis that will once and for all rid us of the dreaded z wobble. It uses beefy 12mm rods and more ball bearings although Im a little worried about the plastic that close to the heater core.

Yet another extruder

There has to be a solution to our extruder problems: filament drags, the plunger works itself loose, thicker filament is spit back out like green beans, and its hard to clean. Thing 7113 attempts to fix this using ball bearings (see a trend?) and Thing 7564 modifies this for the mk4/5 dc gear motor. Why dc motor? Because while I know the print quality is worlds better until I can get around to redesigning the electrical system Im not so interested in using the gen 4 electronics on the cupcake. Edit: Here are some other files worth a look at: Thing 6402 and 6492.

Arguably that is probably more printing than a new Mendel but we wouldn’t be doing this if it was easy!

Filed under: Build, Mechanical, Things

The Profilenator

Thanks to everyone for helping get our Makerbot settings back in order tonight. Using the Profilenator we were able to work up some settings for each color of plastic in the following spreadsheet link. I recommend setting up profiles for each color just to make things easier. We didnt get around to PLA or the natural ABS so we need to work on that.

Profilenator Settings

So now armed with some math, you need to properly configure the skeinforge settings as follows: Fill, Raft, Speed, Carve, and Inset.I’ll walk you through the settings for black ABS. For any of the others, take the numbers from the spreadsheet above and plug them into the appropriate highlighted fields.

Fill

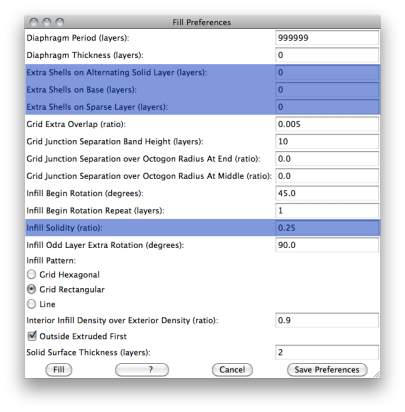
You should set the 3 settings for extra shells depending on whether its a small object or not. Thin objects like gears or things with lots of holes I would set at 0, most other things at 1, and water tight vessels at 2 or even 3. Also, infill solidity can be adjusted generally anything from .25 to .5 fill is good. Small things could work just as well at 1.0.

Raft

Under raft we’ve been setting the thickness/thickness settings to match our w/t value. YMMV. Also for posterity I like to set the temperatures here but I don’t think it actually does anything.

Speed

Under the Speed settings is where we set diamter/thickness to match our w/t setting, our feedrate in mm/s (somewhere around 30-36), and our flowrate PWM setting that should be no less than 240 and no more than 255. Our travel feedrate seems to function best at 32 mm/s regardless of material.

Carve

Here once again is our width/thickness setting and we will also need to setup the layer thickness. Layer thickness seems to work at .36 but that might change for PLA or baby elephant pink.

Inset

One last time for our w/t setting.

And now you should be done with setup and can save all the settings, generate gcode,  and start printing. Well not quite. Because things are retarded and I can’t figure out another way to set temperature we’ve had luck hitting the gcode tab after generation and modifying the temperature settings at the beginning of the file.

See that 220? Lately that seems to work for ABS at 210. Change the number, save the file, then you can hit the build button. Remember if its got a shiny or bubbly top when it finishes printing its probably too hot and you should drop the temp by a few degrees. PLA for us anyway seems to need to run cooler than the ABS or it becomes a syrupy mess.

GOOD LUCK!

Filed under: Skeinforge, Software

Converting .skp files to .stl

Google Sketchup does not have the option to export files to .stl, but there is a few Plugins available that are capable of converting .skp files you have either created i or downloaded from 3dWarehouse to Replicator G friendly .stl files.

Guitar-list Plugin

This is the best plugin i have found to convert .skp files to .stl

link to plugin download:

http://www.guitar-list.com/download-software/convert-sketchup-skp-files-dxf-or-stl

download .rb plugin file.

drag file into the sketchup plugin file:

library>application support>google sketchup8>plugins

if there isn’t a plugin folder create one and put it in there.

open model in Sketchup. Under the Tools menu, there should be a selection: Export DXF or STL

select all model> convert to either cm or inches in drop menu> select export to stl in drop menu> choose folder to save file to.

CADspan Plugin

This plugin does alright, but it takes a long time to process the file to STL

download and install program program from their website http://www.cadspan.com/tools . You will need to create a account with your email and password to login and use the plugin.

open your file in sketchup

Tools> CADspan tools> Resurface

it will ask for your username and password. Under the CADspan Tab click Upload. after geometry is loaded, click Process. this should take a while, but when it is finished you can click STL download. This will take you to a website where you can download the converted .stl file.

Su2stl

http://rhin.crai.archi.fr/rld/plugin_details.php?id=429

i haven’t tried this plugin yet, but it seems popular online.

Filed under: Uncategorized

Makerbot Settings/

Hello friends!  Stanley Tucci Here,

Here is the settings I have been using to print on the MK5 lately.  Refer to the handout that Brian handed out at the beginning of the semester for most settings. These are just the settings I have changed.

to change your settings, start by clicking

Generate Code, select pistachio-mk5-heated-platform-abs profile, then edit.

Extrusion over Thickness:

-This setting has seemed to be constantly changing, started at 2.04, and now all the way down to 1.6. I’ve had it set to 1.6 for the past month and have been having great prints, but yesterday (4-15) we were printing at 1.3.. So keep experimenting with this number.

    Set to 1.6 in all these Skienforge settings:

Raft > Base layer thickness over layer thickness > 1.6

Speed > Extrusion diameter over thickness > 1.6

Carve > Extrusion width over thickness > 1.6

Inset > Extrusion perimeter width over thickness > 1.6

Fill Settings


Layers:

Set to 0 – does one layer, better for resolution

Set to 1– does two layers, better for strength and solidity

It would be a good idea to boost the number up for extra strength. Or, you may want to liquor up the print to 4 0r 5 layers to print a whiskey tight shot glass.

Chang this setting under:

Diaphragm Thickness (layers):  0

Extra Shells on Alternating Solid Layer (layers):  0

Extra Shells on Base (layers):  0

Extra shells on sparse layer (layers):  0

Infill solidity (ratio):

-Set to 0.25, plenty solid, saves some material and print time,

-Set to 0.5, highest I would go, makes a solid and strong object, good for making a RepRap part. Etc.

-setting to the infill ratio to either the  .5  or .05 variable seems to make an even grid or waffle-like form on the inside of object, which seems to make a more proficient print.  If it still isn’t filling correctly you may need to change the shape of the Infill Pattern depending on the shape of the object.

Hexagonal – Rectangular – Line

Comb


Activate comb for more resolution, especially for parts with holes or open spaces. The Makerbot will only print where there is material, best as possible, sometimes…

Temperature

You may need to adjust the temperature higher or lower depending on if you are printing with PLA or ABS.

PLA:  ~220

ABS:   210-215

I have found that 215 works great on most models, 210 if there is overhangs on the object.


Changing Temperature:

The Raft settings for temperature in Skienforge do absolutely nothing in correlation to the print. But, there is a way to lower the temperature of the extruder in the Gcode, which makes for higher resolution and more successful prints.

After you generate the code,  do this:

In the ReplicatorG window, you can view either the model or the Gcode by selecting a tab on the top left of the viewing window.

The 1st line of code will read:

M104 S220 TO (Extruder Temperature to 220 Celsius)

Simply erase the 220 and replace it with the desired temperature.

The new line of code will read:

M104 S215 TO (Extruder Temperature to 215 Celsius)

Now the Makerbot will print a more accurate and controlled temperature.


Viewing temperature during print:

It is extremely helpful, if not necessary to be monitoring the temperature of the extruder during prints.

To do this:

Drop down the Replicator G tab located next to apple on the top left corner of the screen

Select Preferences

Check the 1st box labeled: Monitor Temperature during builds

Now, on the right of the yellow bar above the model window you can view the live temperature of the extruder during print.

Hopefully this helps. One thing we know about the Makerbot is it is pretty bipolar, and the settings are constantly changing. I was printing yesterday at 1.3 on the extrusion over thickness, so there is definitely more tuning that needs done.  Keep it Real.

Filed under: Uncategorized

Congrats to Wheeler!

Within 5 days of starting his Thingiverse account, our very own Michael Wheeler’s first design contribution, a better pinhole adapter for a Nikon camera, has been featured on the Makerbot blog. Congrats Michael! Now, the rest of you get out there and make something!

Filed under: Things

Skeinforge mojo

Skeinforge documentation found here.

Skeinforge: Fill.

Skeinforge: Speed.

Filed under: Skeinforge

Blender shortcuts

Step 1= find an object on thingiverse or build your own –

download by either saving and opening later, or open directly into Blender.

Step 2= clean, re-size, export

Clean your model:

Hit tab to select object mode

Hit A to select all nodes (image appears yellow and purple)

Type W6 to remove all vertices  (these are extraneous points)

Resize your model:

Hit N to open the transform properties box. Each unit = 1mm

Increasing the unit number is what the original scale will be multiplied by.

Export:

Export your cleaned and resized model as an .stl

You may need to change the file name in order for it to save properly.


For some more Blender check out these collected tutorials.

Filed under: Blender

Wrapping things up

Well folks, we are getting there on the build process and roughly on schedule. It would be super awesome to be calibrating by weeks end, 02.10. A few things to start wrapping it up follows:

Finish heated build platform. It might be a good idea to sand blast the kapton while still in its sticker form and there was something about covering the exposed solder pads on the circuit board, those that might touch the aluminum spreader, so lets double check and get it done to finish wiring.

Wiring and cable management. Double check the graphic above for what connects where, use zip ties on everything to tidy it up, but leave enough room to move at least on those parts that, well, move. The drawing doesn’t show connections to the RELAY BOARD so verify that little mod. Basically, if we hook the heated build platform or mk5 extruder straight to the extruder controller the magic white smoke will escape. To prevent that, we will use a wire from “Extra” on the extruder board and connect that to one input on the relay board. This output will then be connected to the heated build platform. (The wire for the thermistor looks like it connects to “Fan” I assume as an extra input.) Then we use a third wire to connect the “Heater” output on the extruder controller to the second relay and its output is then connected to the heater core on the extruder. (I also noticed this has the wiring for the automatic build platform and ours is not so automatic so the drawing is not entirely useful now is it?)

Mechanical calibration. There looks like some good things to check through on this post including both physical and electrical things to test things out. I think it would be good to do a few steps with the ReplicatorG controlling motors just to make sure the wiring is good. (Remember there are no endstops.)

Test, wire, and test the extruder again. Lets see some melted plastic but before we jump in, lets double check everything 2 or 3 times over. This should probably be done after the extruder and HBP is installed in the bot and all the wiring is complete. Remember relay board. We can continue to work on the mk4 as needed.

Add bling. Use the roll of 12volt led tape, maybe around the inside top of the makerbot? Might be best to hook directly to a spare 12v lead from the power supply.

Update the firmware. This needs to be done on both the extruder board and motherboard to make things work as best as they can.

Hand it over to the software team. Now its tome to see if we can put all of it together to actually print things. Remember here’s some PID settings and a post to calibrate feed rate. Might be useful. Sorry guys, but no one prints at this point until the software team gives us the go ahead.

Filed under: Build

Skinning recycled tech

John posted an article on his blog about skinning recycled technology that features some of the parts he brought to class the other night and shows some of the tech our friends in Industrial Design have access to.

Filed under: Uncategorized

Mathematical polyhedra

Some interesting mathematical forms by George Hart that might be worth trying out sometime.

Filed under: Things

ART39AS Building 3D Fabricators

This course introduces DIY digital fabrication through three-dimensional modeling and rapid prototyping technologies for the incorporation into works of art and design. Through the construction of a commercially available open source 3D fabricator, this course addresses issues surrounding open source manufacturing and topics including data acquisition, modeling, visualization, modularity, and material practices.

Calendar

May 2024
M T W T F S S
 12345
6789101112
13141516171819
20212223242526
2728293031  

Categories